
Allows you to change the order of display of the issues on the Receiving screen. You cannot move an issue above the next expected issues. After selecting this option from the Receiving screen, the system prompts with the form.
From position – enter the line position of the issue you want to move
To position – enter the line position that you want to issue to move to. If you move an issue upwards in the list, the To position equals the final position in the list. In our example, the issue formerly at line 11 will be moved to line 9. The issue formerly at line 9 will now display on line 10. If you move an issue downwards in the list, the issue will be moved to the position below that defined by the To position. For example, if you moved an issue from line 9 to line 11, the issue will display under the former contents of line 11.
Use the option to restrict what you see on the Receiving screen. The system displays the Filter by form.

Status – select one or more statuses. The system will show you only issues with these statuses.
Barcoded issues – if checked, the system will show only issues that have been barcoded.
Use the button to clear previous filtering restrictions. Press to return to the Receiving screen. The header portion of the Receiving screen will be updated with your new filter restrictions. Also, the system will display issue information according to your filter restrictions.
In the example, we have selected to display only claimed issues. After pressing , we return to the Receiving screen.

Notice that the header has been updated to let us know that we are only displaying Claimed issues. Only 3 out of 25 issues have the Claimed status.
Note
Filters remain in effect after you leave the Receiving screen. Use the button on the Filter by form to reset the filter.
From the Receiving screen, select a line that has the Barcoded column set to Yes and then choose the icon. The system displays the Item summary screen for the selected issue.

You are not allowed to add new barcodes, only update/delete barcodes that have already been created for the selected issue. If you wish to add a barcode to an issue, use the icon from the Receiving screen.
If you select the icon from the Receiving screen, the system displays the Holdings statement for shelfmark sets screen.
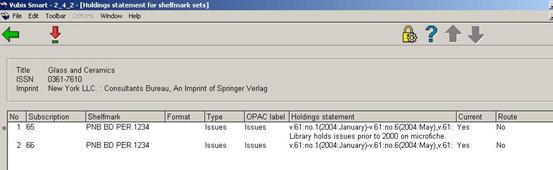
The system displays the summary holdings statement for each subscription at the current SHIPTO location.
Double-click one of the entries to update the holdings statement for one of the subscriptions. The system responds by displaying the Holdings statement form. Please refer to section 321.4.3 for a detailed explanation of the fields on this form.

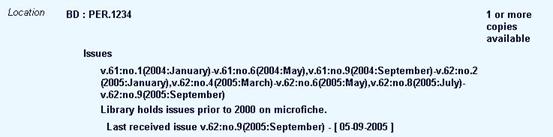
Notice the holdings statement that the system has automatically generated for this location. It has taken into account that v.61:no.7, v.61:no.8, v.62:no.3 and v.62:no.7 are not yet received.
This statement displays in the WebOpac as
If you turn off the Automatically generate holdings flag, the system displays only what you put into the Retrospective statement and Follow up statement fields. You might prefer to list this subscription’s holdings as follows:

The resulting WebOpac display follows.

·
Document control - Change History
|
Version |
Date |
Change description |
Author |
|
1.0 |
July 2006 |
creation (complete revision for release 2.4.2 serials modifications) |
|
|
2.0 |
March 2007 |
added clarification of manual claiming |
|
|
3.0 |
November 2007 |
added info on override password for deleting multiple received issues |
|